

Scheduling interviews  Premium Feature
Kaizen Recruit ATS allows you to easily schedule interviews with applicants without the time-exhausting back and forth e-mailing by painting over your available time(s), then have your applicants pick one of them. To fully utilize the scheduling feature, we recommend all users connect their Office365, Google, Exchange or iCloud calendar under “Your Settings“.
No double bookings
Since the system checks your calendar when an applicant confirms a time, new events in your calendar will block off times that have already been sent to them. You can paint your availability quickly for several applicants, then have your calendar fill up as they confirm times, blocking off times for others. This way, we prevent double bookings from happening.
Sending a scheduling request

To start scheduling an interview with an applicant, click the “Schedule a [interview type] interview” button in their profile once they’re in an interview stage.
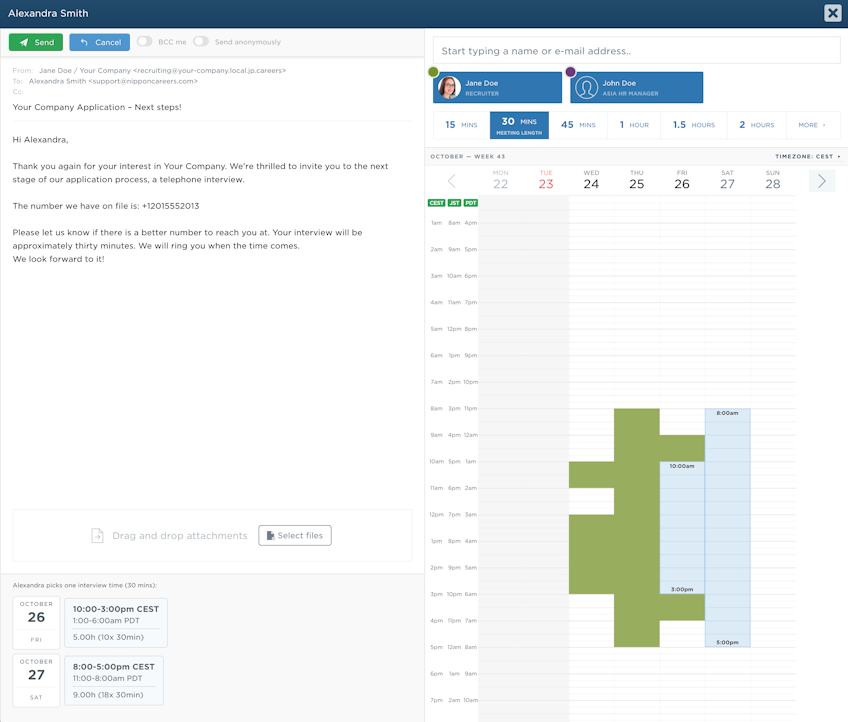
The system will pop out the e-mail dialog, this time with your calendar view on the right hand side. You will choose possible interview times for the applicant to choose one out of. They will get an e-mail once you’re done asking to confirm a time.
Scheduling process
The scheduling process is quick and easy:
- Select the interview length and add any interviewers you wish.
- Click and drag to paint over your calendar to select your and other interviewers’ availability. If you have all connected your calendar, it is very easy to find a time that is suitable for all as everyone’s calendar events will be displayed.
- Edit the e-mail like normal before sending it off.
- The applicant gets the e-mail, which contains a link to select a time.
- Once the applicant has confirmed a time, all the interviewers’ calendars will be booked automatically.
Adding and removing interviewers

Colleagues that were pre-selected in “Interview stages and process settings” are automatically selected as the interviewers.
To add a colleague as an interviewer for a specific applicant, just type in part of their name or e-mail address at the top. Select their name from the list to add them. You can see their specific color for calendar events to the left of their name. Remove an interviewer by clicking on their name.
Changing the interview length

To change the interview length, simply click on the choices from 15 minutes to 2 hours. If none of the times suit you, click “More >” to reveal custom interview length options.
Painting your availability in the calendar
To paint over the calendar, start by hovering your mouse over the calendar. As you hover, you will see the time in:
- Your current timezone (click the “Timezone” text on top right to change it)
- The applicant’s timezone.
- If any of the other interviewers are in other timezones, theirs are listed as well.
Click and drag down to start painting over the calendar. You will see the time slots come in as you drag; if you’ve chosen a one hour meeting, the slots will be one hour long. If you drag over four hours, you will have four slots for the applicant to choose from.
Blocking and non-blocking events
If an event is marked as “Busy” in your calendar, it will show up as blocking in the scheduling feature. If you’ve set yourself as available, you will still see the event, but can paint times over it.
Removing painted times
To remove a painted block of time, simply click on it. You can see it turning red as you hover the block.

Click on the right and left arrows to navigate the week you are looking at. The system allows you to schedule up to 4 weeks in advance.
Confirming an interview time

When the applicant confirms an interview time, all interviewers will:
- Have their connected calendars booked.
- Get a notification in their globe notifications in the header.
- See the interview under “Your interviews” in the dashboard.
If you have configured e-mail notifications, those will also be sent out. The applicant will receive a thank-you message confirming the time.
Getting a rescheduling request
The applicant can ask for you to reschedule the interview if none of the times suit them. You will get a notification that they wish to reschedule, and you can repeat the sending process again.
Canceling the interview
To cancel the interview, click the “Cancel interview” button. The applicant will not be notified as you are expected to communicate the cancelation yourself. To schedule again, just click the interview schedule button and repeat the process.
After an interview

After a scheduled interview time has passed, the applicant’s interview stage status will automatically be set to Completed by the system.
You will see the buttons to move the applicant to the next stage or decline them.
Offer letters

Once you’ve completed the interview stages and wish to extend an offer letter to the applicant, you will mark them as either having accepted or rejected the offer.
Marking applicants as having accepted or rejected an offer affects your hiring statistics. It is extremely important for visibility across your hiring practices for managers, so be sure to use it.
- Move the applicant to the “Offer” stage.
- Click “Accepted” if the applicant accepted your job offer.
- Click “Rejected” if the applicant rejected your job offer.